Rental Renovation Management: A Practical Owner’s Guide
October 27, 2026
Rental renovation management is the work of running a renovation on an income property as a business project. You set a measurable goal, build a budget with a cushion, hire and supervise licensed trades, follow the safety and tax rules, keep tenants informed, and get the unit leased on a date you chose in advance. Done well, it protects your return. Done badly, a “quick refresh” turns into months of vacancy. This guide walks through each stage in the order the work actually happens.
TL;DR
- Start with a number, not a mood board: pick one outcome (higher rent, lower vacancy, fewer maintenance calls) and judge every line of scope against it.
- Budget bottom-up, add a contingency, count soft costs, and schedule backward from the date you want the unit leased.
- Verify contractor licenses, insurance and references, and put scope, timeline and payment terms in writing.
- Pre-1978 housing brings federal lead-safe work rules and disclosure duties, and your city’s codes and permits apply on top.
- Improvements and repairs are taxed differently, so decide which is which before the work starts, with your tax professional.
Table of Contents
- What renovation management covers on a rental
- Step 1: Set goals you can measure
- Step 2: Choose the scope that fits the property
- Step 3: Build a budget that survives surprises
- Step 4: Hire and manage contractors
- Step 5: Stay on the right side of safety rules, codes and permits
- Step 6: Keep tenants informed and disruption low
- Step 7: Decide whether it was worth it
- Our perspective
- When to bring in a manager
- A pre-renovation checklist
- FAQ
- Sources
What renovation management covers on a rental
On an owner-occupied home, a renovation is a personal project. On a rental, it is a capital decision with a payback period, a tenant (or an empty unit costing you rent every day) and legal obligations attached. Managing it means owning six things at once:
- Goals and scope: what you are trying to achieve and what is in or out.
- Budget and schedule: the money, the sequence of trades and the lease-up date.
- Vendors: who does the work, under what contract, and who checks it.
- Compliance: permits, codes, lead-safe practices and disclosures.
- Residents: notice, access and, in occupied buildings, disruption.
- Financial review: what it cost, how it is treated for tax and what it returned.
Owners who live far from the property, hold several units or simply do not want a second job usually hand this coordination to a property manager. We cover that option further down. First, the stages.
Step 1: Set goals you can measure
The most common renovation mistake is starting with finishes. Start with the outcome. Forbes Business Council contributors make the same point about the repair-or-renovate decision: define the project’s primary purpose first, whether that is code compliance, attracting tenants, cutting maintenance calls, raising rent or repositioning the property, and then weigh cost against likely rent, utility, maintenance and retention benefits.
Turn that purpose into a figure you can check afterward:
- “Raise rent by a set amount per month on this unit.”
- “Cut turnover days from the last move-out to the next move-in.”
- “Eliminate the plumbing leaks that generated repeat work orders.”
- “Reduce utility costs the tenant or the owner pays.”
A goal with a number lets you say no to scope creep. If a granite countertop does not move the number, it does not go in the plan.
Think in systems, not isolated upgrades
The U.S. Department of Energy’s homeowner guidance recommends a whole-house approach: consider how changes interact across the building’s systems, and choose measures that together improve efficiency, comfort, durability, health and safety. On a rental, that means you do not install new windows over a wet wall, or new flooring before you have dealt with the plumbing leak that will ruin it. Fix the envelope and the systems first, finishes last.
Run the numbers on a capital-needs basis
Federal housing programs give a useful model even if you never touch one. HUD’s guidance on capital-needs assessments describes documenting the property’s condition, current and future repair and replacement needs, estimated costs, and immediate work tied to life or health threats, code violations, lower operating costs, indoor air quality and competitiveness. You can borrow the structure for a single-family rental: list what must be fixed now, what will fail within a few years, and what is optional. Then decide whether to do one larger rehab now or a smaller one now plus bigger reserves later.
Step 2: Choose the scope that fits the property
Popular renovations for rentals tend to repeat: kitchen refreshes, bathroom updates, flooring, paint, curb appeal, in-unit laundry hookups and smart locks. We go through the list, with a view on which ones tend to pay off, in our guide to the best renovations for your rental property and in a separate piece on green upgrades that pay back.
The filter that matters more than the list is the property itself. Over-renovating is a real risk: a finish level that exceeds what comparable rentals in the neighborhood offer will not necessarily earn back its cost. Check three things before you commit:
- Property size and style. A 900-square-foot bungalow and a four-bedroom family home attract different renters with different priorities.
- The neighborhood. Walk or browse what is leasing nearby and at what rent.
- Competing listings. If every comparable unit has in-unit laundry and yours does not, that is a gap worth closing. If none do, it may be a luxury.
If you want a renter’s-eye view of the choices that make a single-family home easier to lease, see our post on making your home more appealing to renters.
Two practical rules for scope:
- Do the highest-return item first. If money or time runs short, you want the part that earns rent already finished.
- Be wary of moving plumbing. Relocating a sink, toilet or laundry hookup changes walls, floors and sometimes permits. Keeping fixtures where they are is one of the cheapest ways to protect a budget.
Step 3: Build a budget that survives surprises
A rental renovation budget has hard costs and soft costs, and owners usually forget the second group.
| Cost type | Examples |
|---|---|
| Hard costs | Demolition, materials, labor, appliances, fixtures, paint, flooring |
| Soft costs | Design or drawings, permits, inspections, dumpsters and hauling, utilities during work, insurance, marketing the finished unit |
| Carrying costs | Mortgage, taxes and insurance while the unit is empty, plus rent credits or temporary housing if residents are displaced |
| Contingency | A reserve for what the walls reveal once opened |
Build it bottom-up: a written scope of work, a unit cost for each line, then a contingency on top. As a starting point we would carry a smaller cushion on cosmetic work in a newer home and push toward the high end of the range on older structures or anything involving plumbing, electrical or structure, where surprises live. Whatever you pick, decide it before bids arrive so it does not quietly shrink under pressure.
Exterior items deserve their own line because they are large and often urgent. If a roof is in the plan, a property manager’s guide to reroofing projects can help you think through how a big exterior job fits into the rest of your budget and schedule.
Schedule backward from the lease date
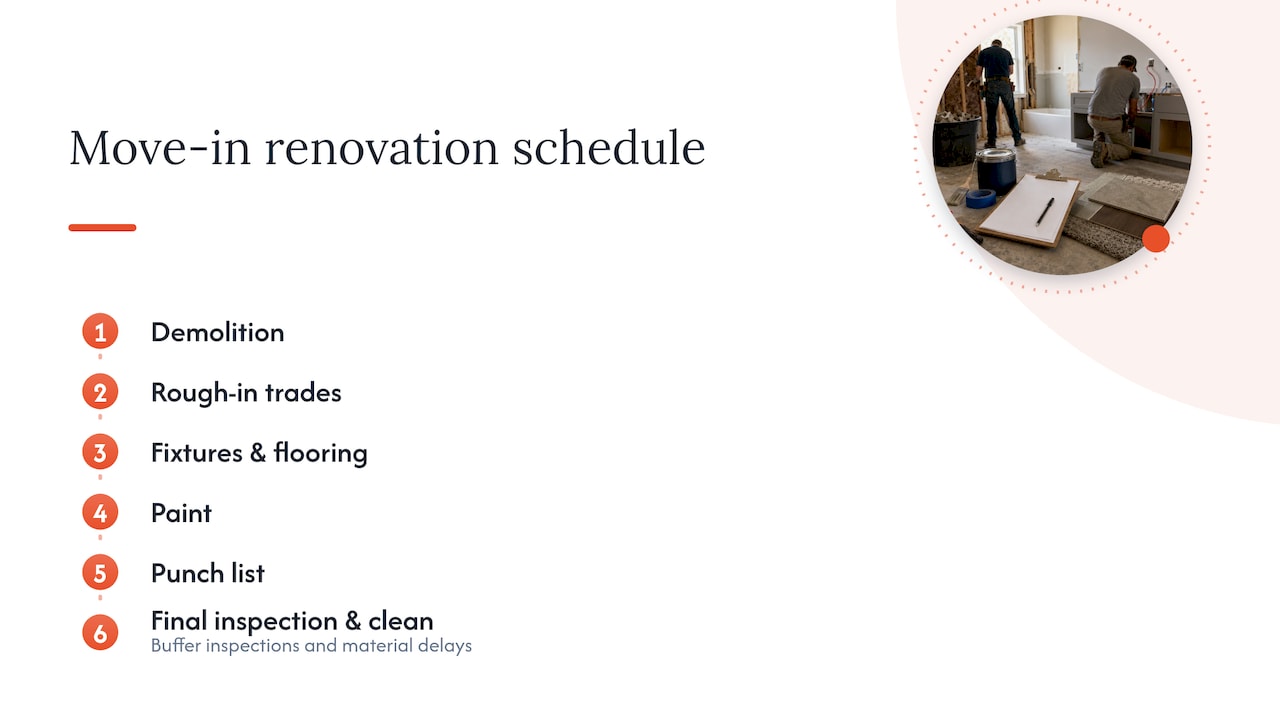
Pick the date you want the first tenant to move in, then work backward: final clean, final inspection, punch list, paint, flooring, fixtures, rough-in trades, demolition. Add buffer days for inspections and material delays. Every week of slippage on a vacant rental is a week of lost rent plus carrying costs, which is why the calendar belongs in the budget conversation. For a clear picture of the end of that timeline, our rental turn process guide shows how the finishing steps fit together.
Step 4: Hire and manage contractors
Most renovations that go wrong do so at the contractor stage. The fundamentals are unglamorous and they work:
- Verify license and insurance with your state or local licensing board and the insurer, not just a certificate handed to you.
- Check references and recent work, ideally rentals or properties of similar age.
- Get at least three written bids against the same scope, so you compare like with like.
- Use a written contract covering scope, timeline, payment schedule and what happens with change orders.
- Tie payments to milestones, not to the calendar.
- Hold regular check-ins and send a written follow-up after each one, so there is one record of schedules, decisions and changes.
Low bid is not the same as low cost. A contractor who underbids and then writes change orders for everything costs more than a fairer bid with a complete scope.
Why in-house coordination helps
Trades have to arrive in order, and one missed handoff (the painter before the drywall has dried, the flooring crew before the plumber is finished) costs days. Property managers who keep their own maintenance staff and a vetted vendor bench can shorten those gaps. That is the model we run: in-house maintenance, transparent vendor selection and a team structure built so the same people follow your project from bid to turnover.
Step 5: Stay on the right side of safety rules, codes and permits
This is where an owner can get into real trouble, so be specific.
Lead-safe work in pre-1978 housing
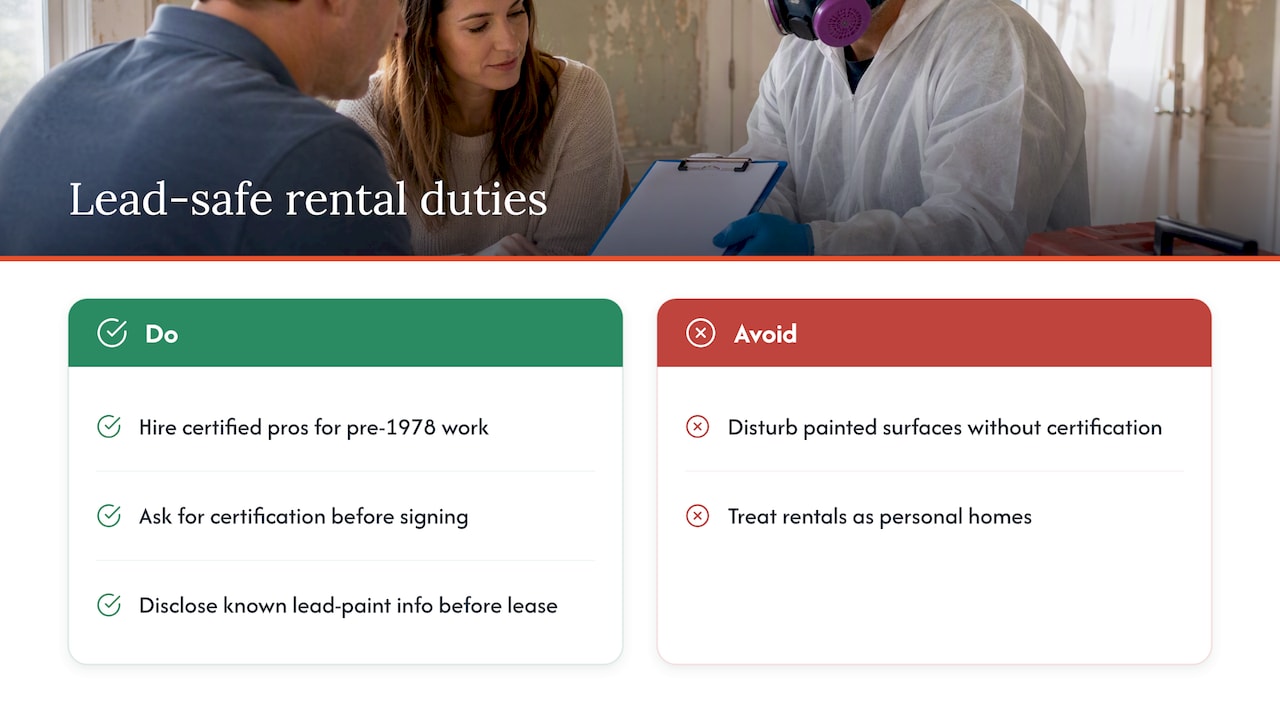
The EPA’s Renovation, Repair and Painting rule requires that anyone paid to disturb painted surfaces in housing built before 1978 be certified and use lead-safe work practices. The rule applies to firms of every size, including sole proprietors, and in general does not cover homeowners working on their own homes. A landlord’s rental is not their personal residence, so hire a lead-safe certified contractor for any pre-1978 rental where the work will sand, cut or demolish painted surfaces, and ask to see the firm’s certification before signing.
Disclosure is a separate duty. Federal law requires landlords of pre-1978 housing to disclose known lead-based paint information before the lease takes effect, a point the City of Wichita’s landlord and tenant handbook spells out in plain terms. We cover the details in two posts: what property managers need to know about lead paint disclosure and what managers and tenants need to know about lead paint.
Local codes, permits and entry notice
Building and housing codes are local. The same Wichita handbook notes that Kansas landlords must comply with city and county building and housing codes, and that entry to a tenant’s home should follow reasonable notice, with 24 hours’ written notice recommended as good practice. Your market will have its own rules. Before demolition, call your city or county building department and ask which parts of your scope need a permit and inspection. Plumbing, electrical, structural changes and roofing commonly do. A contractor who suggests skipping a permit is handing you their risk.
We operate across Charleston and Columbia, SC; Dallas-Fort Worth and Houston, TX; Kansas City and Overland Park; and Jacksonville, FL. Permit thresholds, inspection timelines and licensing differ between them, which is why local knowledge matters more than a generic checklist.
Step 6: Keep tenants informed and disruption low
Empty-unit renovations are simpler. Occupied ones, such as exterior work, a shared-building system replacement, or a unit renovated at renewal, need a communication plan. HUD’s multifamily guidance for occupied rehabilitation involving relocation illustrates the standard: plans must cover tenant needs, notices, schedules and relocation support. Private owners are not bound by those programs, but the structure is sound for anyone:
- Give written notice early, with the scope, start date, expected duration and who to call.
- Set work hours and keep them.
- Protect belongings and common areas, and tell residents how dust, water shutoffs and noise will be handled.
- Give one point of contact who answers quickly.
- Offer remedies when the work is truly disruptive, such as a rent credit or temporary housing, and document what you agreed.
- Confirm completion in writing and invite a walkthrough.
When a renovation ends in a move-out, clearing the unit is part of the job. A landlord cleanout checklist helps you plan removal of left-behind furniture and debris so the crews can start on schedule. If the project will also change rent, give the tenant your pricing news properly: see our tips on telling tenants about rent increases and on raising rent without losing tenants.
Step 7: Decide whether it was worth it
Before you spend, estimate the return. A simple frame: expected monthly rent lift multiplied by the months you expect to keep the unit leased at that rent, plus any savings in vacancy and maintenance, minus total project cost including soft and carrying costs. If the answer is thin, shrink the scope or skip the project. The Department of Energy’s guidance also suggests comparing projects by expected return in time and money, including payback from energy savings.
After you spend, track actuals against the budget and the goal you set in step 1. That record makes the next renovation cheaper to plan.
Repair or improvement: the tax difference
The IRS draws a line between repairs and improvements. Per IRS Publication 527, expenses that result in a betterment to your property include fixing a pre-existing defect or condition and enlarging or expanding the property. Improvements are generally capitalized and recovered over time. For residential rental property, the recovery period is 27.5 years, while ordinary repairs that keep the property in its current condition are generally deductible when incurred. A kitchen gut and a patched faucet are taxed very differently. Because rules and elections can change and your facts matter, ask a CPA who handles rental real estate to classify the project before work begins.
Our perspective
In our experience managing single-family, multifamily and build-to-rent homes across ten regional markets, renovations rarely fail on design. They fail on coordination: a scope nobody wrote down, a vendor chosen on price alone, a lease-up date that nobody owned. That is why we organize around pods, small teams that stay with your property, and why we keep maintenance in-house and select vendors transparently. When the same people who will lease and manage the home also supervise the work, decisions get made with the tenant and the rent roll in mind.
We also push owners to renovate less, not more. The best return often comes from fixing what drives complaints and vacancy and leaving the rest. Our job is to make sure that when you do spend, it is aimed at the goal you set.
— MediaBeast
When to bring in a manager
You can run all of this yourself, and plenty of owners do. A manager makes sense when the property is far away, when you own several units, when the work involves occupied homes, or when you simply want a single accountable team. Our project management service covers renovation oversight: scoping, bids, vendor supervision and getting the unit rent-ready. Pair it with property management and the same team leases the finished home and handles it afterward. Investors weighing larger renovations and repositioning plans can look at our asset management work, and if you are building a portfolio, our multifamily and build-to-rent services apply. To talk through a specific property, start at aubenrealty.com.
Timing matters too. Finishing before the busy leasing months gives the unit its best chance of renting quickly, which is the subject of our notes on leasing season.
A pre-renovation checklist
Before signing any contract, confirm each of these:
- One written goal with a number attached.
- A scope of work listing every item, in order.
- A budget with soft costs, carrying costs and a contingency.
- Three bids against the same scope.
- License, insurance and (for pre-1978 work) lead-safe certification verified.
- Permits identified with your local building department.
- A tenant notice and access plan, or a confirmed vacant unit.
- A target lease date with buffer days.
- Your CPA’s view on repair versus improvement.
FAQ
What is the 2% rule for rentals?
The 2% rule is a rough screening shortcut: monthly rent should equal about 2% of the purchase price. It is a quick filter, not an underwriting method, and it ignores taxes, insurance, repairs and vacancy. In many markets few homes meet it, so use it to sort listings and then run the full numbers, including any renovation cost.
What is the 50% rule for rental property?
The 50% rule is a rough estimate that operating expenses, excluding the mortgage, will consume about half of the rent over time. It is meant for quick comparisons. A freshly renovated property may run below that early on, while older homes with deferred maintenance can run above it.
How much contingency should a rental renovation have?
There is no official figure, but you should always hold a reserve. A lighter cosmetic refresh can carry a smaller cushion, while older homes and projects touching plumbing, electrical or structure call for a larger one. Set the percentage before you collect bids and treat it as untouchable except for true surprises.
Do I need a licensed contractor for a rental renovation?
Usually yes for anything involving electrical, plumbing, structure or roofing, and licensing rules vary by state and city. For pre-1978 housing, paid work that disturbs painted surfaces requires a lead-safe certified firm under EPA rules. Check with your local building department and licensing board before hiring.
Sources
- Lead Renovation, Repair and Painting Program (EPA)
- Publication 527, Residential Rental Property (IRS)
- Residential rental property recovery period (GovInfo)
- Energy Saver guide (U.S. Department of Energy)
- Capital-needs assessment guidance (HUD)
- Relocation guidance for occupied rehabilitation (HUD MAP Guide)
- Landlord and Tenant Handbook (City of Wichita)
- To Repair Or Renovate: What’s In Your Best Interest? (Forbes Business Council)